<br>
# My Thoughts
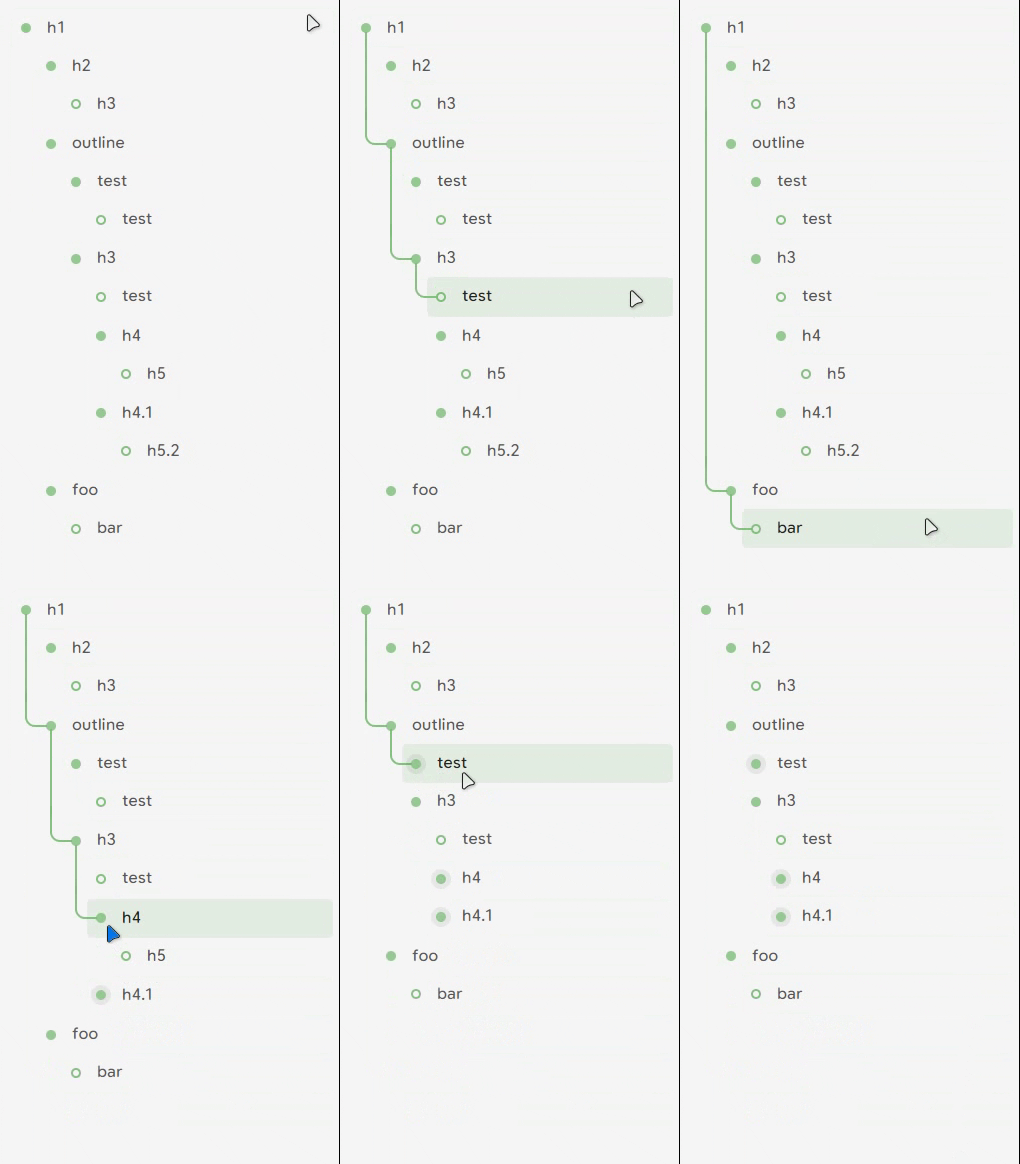
- 로그시크(Logseq)에 있는 기능 중 하나 가져오고 싶은 것 하나가 [Bullet Threading 플러그인](https://github.com/pengx17/logseq-plugin-bullet-threading)이다.
- 아래와 같이 마우스를 서브 블렛(bullet)으로 가져가면, 선이 이어져서 보이는 기능이다.
![[Bullet Threading.png]]
- 아직 옵시디언에서 플러그인 형태로 지원하지 않지만, CSS snippet(스니펫)을 이용하여 이 기능을 구현할 수 있다.
![[Obsidian_BulletThreading_CSS.gif|300]]
<br>
## Summary
### Step 1. bullet_threading.css 다운로드 or 만들기
아래 사이트에서 4개의 CSS 파일을 다운로드한다.
[Obsidian list threading and highlight in live preview and source view · GitHub](https://gist.github.com/KillyMXI/cbef8edff6dd55d9e6ea4df66567e9b1?permalink_comment_id=5159657)
~~아래 사이트에서 bullet_threading.css 파일을 다운로드하거나 텍스트 편집기에 아래 코드를 넣고 저장한다.~~
~~https://github.com/analysisman/secondbrain/blob/master/bullet_threading.css~~
```
body {
--outline-guideline-width: var(--size-2-1);
--outline-guideline-color: var(--color-accent);
--outline-item-height: calc(var(--nav-item-size) * 1.8);
}
li {
position: relative;
}
/* In-between items */
li:hover > ul > li:has(~li:hover)::before {
content: "";
width: var(--outline-guideline-width);
position: absolute;
background-color: var(--outline-guideline-color);
top: calc(var(--outline-item-height) / 2 * -1);
left: calc(-2px - 2em - var(--size-4-4));
height: calc(100% - var(--outline-item-height) + var(--size-4-8) + 2px);
}
/* Elbows items */
li:hover > ul > li:hover::before {
content: "";
position: absolute;
top: calc(var(--outline-item-height) / 2 * -1);
left: calc(-2px - 2em - var(--size-4-4));
bottom: calc(100% - (var(--outline-item-height) + var(--size-4-2)) / 2 + 1px);
width: calc(1em + var(--size-4-4) - 2px);
border-bottom-left-radius: var(--radius-m);
border-bottom: var(--outline-guideline-width) solid var(--outline-guideline-color);
border-left: var(--outline-guideline-width) solid var(--outline-guideline-color);
}
```
<br>
### Step 2. Snippets 폴더 아래 해당 파일을 옮기거나 저장한다.
Vault(보관소) 아래 .obsidian → snippets 폴더 내에 css 파일을 넣는다.
(예: /Users/analysisman/Obsidian/Analys1sMan/.obsidian/snippets/bullet_threading.css)
bullet-list-live-preview-highlight-active.css
bullet-list-live-preview-highlight-hover.css
bullet-list-live-preview-threading-active.css
bullet-list-live-preview-threading-hover.css
> [!info] macOS에서 .obsidian 폴더는 hidden 폴더이니, Command+Shift+. 를 눌러 보이게 할 수 있다.
<br>
### Step 3. CSS를 활성화한다.
Options(옵션) → Appearance(테마) → CSS snippets(스니펫)에서 해당 CSS를 활성화시킨다.

아래와 같이 마우스를 sub bullet 리스트로 옮겨보면, bullet threading 기능이 된다.
~~단, Editing mode에서는 안 되고 Reading mode에서 보인다.~~

<br>
# References
[Obsidian list threading and highlight in live preview and source view · GitHub](https://gist.github.com/KillyMXI/cbef8edff6dd55d9e6ea4df66567e9b1)
[Plugin for Bullet Threading - Plugins ideas - Obsidian Forum](https://forum.obsidian.md/t/plugin-for-bullet-threading/37317)
<br>
# Links
[[_MOC_1_Obsidian]]
<br>
# Tags
#obsidian #logseq #css #plugin
<br>